如何用 YubiKey 或 CanoKey 在 Windows 平台生成 GPG 并签名 Github Commit
最近分别从亚马逊和国内某宝购买了 YubiKey 和 CanoKey,于是准备尝试下期待已久的 PGP 加密功能,并将操作过程中踩过的坑记录下来。

环境准备
首先,最为关键的是准备一台可信赖的 Windows 电脑,绝对不要在公共电脑上生成 PGP。然后安装以下必要软件:
Git Bash:用于代替 Windows Powershell 执行 Shell 命令,下载地址:Git - Download for Windows;
Gpg4win:用于在 Windows 平台上执行
gpg命令,下载地址:Gpg4win - Download。- Gpg4win 是 GunPG 在 Windows 平台上的实现。
- 而 GnuPG (GPG) 又是 PGP 的一个开源实现 (OpenPGP)。
不同的平台表述可能不同,我们可以粗略的认为 PGP、GPG 与 OpenPGP 指的是同一个东西。
准备工作完成后,即可进入正题。
在电脑上生成密钥对
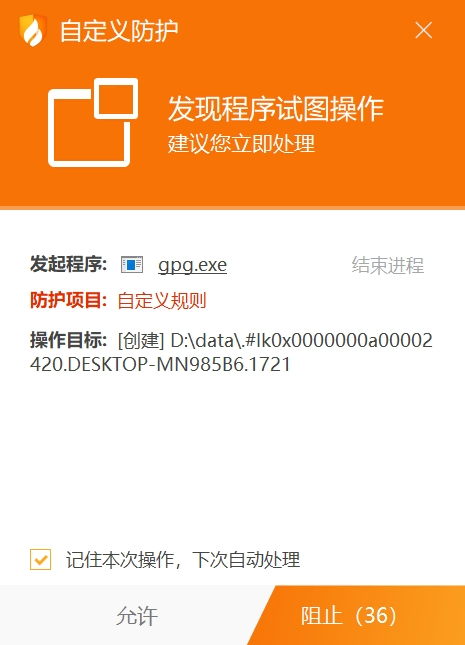
首先让电脑保持脱机状态(断网),然后创建临时文件夹(本文以 /d/data 表示)并开启火绒的文件夹保护功能(防护中心 -> 高级防护 -> 自定义防护 -> 添加规则),将 /d/data 添加到保护对象,有任何程序访问 /d/data 时触发询问。最后从【文件管理器】进入 /d/data,右键打开 Git Bash,键入命令生成 GPG:
通过
gpg --homedir ./ --expert --full-gen-key命令生成 GPG 主秘钥:1 2 3 4 5 6 7 8 9 10 11 12 13 14 15 16 17 18 19 20 21 22 23 24 25 26 27 28 29 30 31 32 33 34 35 36 37 38 39 40 41 42 43 44 45 46 47 48 49 50 51 52 53 54 55 56 57 58 59 60 61 62 63 64 65 66 67 68 69 70 71 72 73 74 75 76 77 78$ gpg --homedir ./ --expert --full-gen-key gpg (GnuPG) 2.2.41-unknown; Copyright (C) 2022 g10 Code GmbH This is free software: you are free to change and redistribute it. There is NO WARRANTY, to the extent permitted by law. gpg: keybox '/d/data/pubring.kbx' created Please select what kind of key you want: (1) RSA and RSA (default) (2) DSA and Elgamal (3) DSA (sign only) (4) RSA (sign only) (7) DSA (set your own capabilities) (8) RSA (set your own capabilities) (9) ECC and ECC (10) ECC (sign only) (11) ECC (set your own capabilities) (13) Existing key (14) Existing key from card Your selection? 11 # [1] 选择自定义 ECC,用于生成主秘钥 Possible actions for a ECDSA/EdDSA key: Sign Certify Authenticate Current allowed actions: Sign Certify (S) Toggle the sign capability (A) Toggle the authenticate capability (Q) Finished Your selection? a # [2] 选择身份验证功能 Possible actions for a ECDSA/EdDSA key: Sign Certify Authenticate Current allowed actions: Sign Certify Authenticate (S) Toggle the sign capability (A) Toggle the authenticate capability (Q) Finished Your selection? q # [3] 退出选择 Please select which elliptic curve you want: (1) Curve 25519 (3) NIST P-256 (4) NIST P-384 (5) NIST P-521 (6) Brainpool P-256 (7) Brainpool P-384 (8) Brainpool P-512 (9) secp256k1 Your selection? 1 # [4] Curve 25519 安全性最高 Please specify how long the key should be valid. 0 = key does not expire <n> = key expires in n days <n>w = key expires in n weeks <n>m = key expires in n months <n>y = key expires in n years Key is valid for? (0) 0 # 永不过期 Key does not expire at all Is this correct? (y/N) y GnuPG needs to construct a user ID to identify your key. Real name: yourname # [5] 键入用户的名称、邮箱等信息 Email address: yourmail@xxx.com Comment: GPG Key You selected this USER-ID: "yourname (GPG Key) <yourmail@xxx.com>" Change (N)ame, (C)omment, (E)mail or (O)kay/(Q)uit? o # [6] 确定 We need to generate a lot of random bytes. It is a good idea to perform some other action (type on the keyboard, move the mouse, utilize the disks) during the prime generation; this gives the random number generator a better chance to gain enough entropy. gpg: /d/data/trustdb.gpg: trustdb created gpg: directory '/d/data/openpgp-revocs.d' created gpg: revocation certificate stored as '/d/data/openpgp-revocs.d/1CDAFE3696DB37B9525F52F7A5B7DDAE5D2EA505.rev' public and secret key created and signed. pub ed25519 2023-12-23 [SCA] 1CDAFE3696DB37B9525F52F7A5B7DDAE5D2EA505 uid yourname (GPG Key) <yourmail@xxx.com>键入
11,选择自定义 ECC;键入
a,选择身份验证功能;键入
q,退出选择;选择安全性最高的算法 Curve 25519;
键入用户的名称、邮箱等信息;
键入
o生成 GPG 密钥,此时会弹出窗口提示用户输入认证密码,这里我们直接点击确认,不使用密码: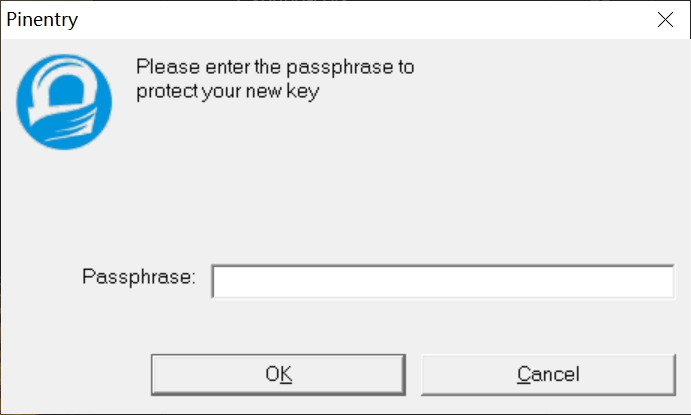
最终,记录上述命令生成的 Key ID
1CDAFE3696DB37B9525F52F7A5B7DDAE5D2EA505。如果火绒弹出 gpg 或 git 的权限确认窗口,点击允许,其它程序尝试读取一定要拒绝!
通过
gpg --homedir ./ --expert --edit-key {Key ID}命令生成用于签名的子密钥:1 2 3 4 5 6 7 8 9 10 11 12 13 14 15 16 17 18 19 20 21 22 23 24 25 26 27 28 29 30 31 32 33 34 35 36 37 38 39 40 41 42 43 44 45 46 47 48 49 50 51 52 53 54 55 56 57 58 59 60 61 62$ gpg --homedir ./ --expert --edit-key 1CDAFE3696DB37B9525F52F7A5B7DDAE5D2EA505 gpg (GnuPG) 2.2.41-unknown; Copyright (C) 2022 g10 Code GmbH This is free software: you are free to change and redistribute it. There is NO WARRANTY, to the extent permitted by law. Secret key is available. gpg: checking the trustdb gpg: marginals needed: 3 completes needed: 1 trust model: pgp gpg: depth: 0 valid: 1 signed: 0 trust: 0-, 0q, 0n, 0m, 0f, 1u sec ed25519/A5B7DDAE5D2EA505 created: 2023-12-23 expires: never usage: SCA trust: ultimate validity: ultimate [ultimate] (1). yourname (GPG Key) <yourmail@xxx.com> gpg> addkey # [1] 生成子密钥 Please select what kind of key you want: (3) DSA (sign only) (4) RSA (sign only) (5) Elgamal (encrypt only) (6) RSA (encrypt only) (7) DSA (set your own capabilities) (8) RSA (set your own capabilities) (10) ECC (sign only) (11) ECC (set your own capabilities) (12) ECC (encrypt only) (13) Existing key (14) Existing key from card Your selection? 10 # [2] 子密钥类型为签名密钥 Please select which elliptic curve you want: (1) Curve 25519 (3) NIST P-256 (4) NIST P-384 (5) NIST P-521 (6) Brainpool P-256 (7) Brainpool P-384 (8) Brainpool P-512 (9) secp256k1 Your selection? 1 # [3] 选择 Curve 25519 算法 Please specify how long the key should be valid. 0 = key does not expire <n> = key expires in n days <n>w = key expires in n weeks <n>m = key expires in n months <n>y = key expires in n years Key is valid for? (0) 0 Key does not expire at all Is this correct? (y/N) y Really create? (y/N) y We need to generate a lot of random bytes. It is a good idea to perform some other action (type on the keyboard, move the mouse, utilize the disks) during the prime generation; this gives the random number generator a better chance to gain enough entropy. sec ed25519/A5B7DDAE5D2EA505 created: 2023-12-23 expires: never usage: SCA trust: ultimate validity: ultimate ssb ed25519/FDCDCB97899ED8C9 created: 2023-12-23 expires: never usage: S [ultimate] (1). yourname (GPG Key) <yourmail@xxx.com> gpg> save # [4] 保存- 键入
addkey,开始生成子密钥; - 键入
10选择生成签名子密钥 (sign only); - 键入
1选择 Curve 25519 算法; - 保存子密钥,弹出窗口后仍旧不输入密码。
最终生成的
FDCDCB97899ED8C9即是子密钥的 Key ID,子密钥后的usage: S表示该密钥用于签名认证。- 键入
将私钥导入物理秘钥
将物理秘钥插入 USB 端口,然后打开任务管理器,强制关闭可能存在的 gpg-agent.exe,执行 gpg --homedir ./ --edit-key {Key ID} 命令将私钥导入物理秘钥:
| |
- 键入
key 1选择第一个密钥,被选中的密钥前边会有个*; - 键入
keytocard开始写入物理秘钥; - 键入
1指定密钥类型为签名密钥; - 键入
save完成持久化,写入时会弹窗提示输入 GPG ADMIN PIN,默认为12345678。
写入完成后,执行 gpg --card-status 查看写入结果:
| |
Signature key 正确显示,说明密钥导入成功。
导出 GPG 公钥
若要通过 GPG 签名 Github Commit,需要导出 GPG 的公钥:
| |
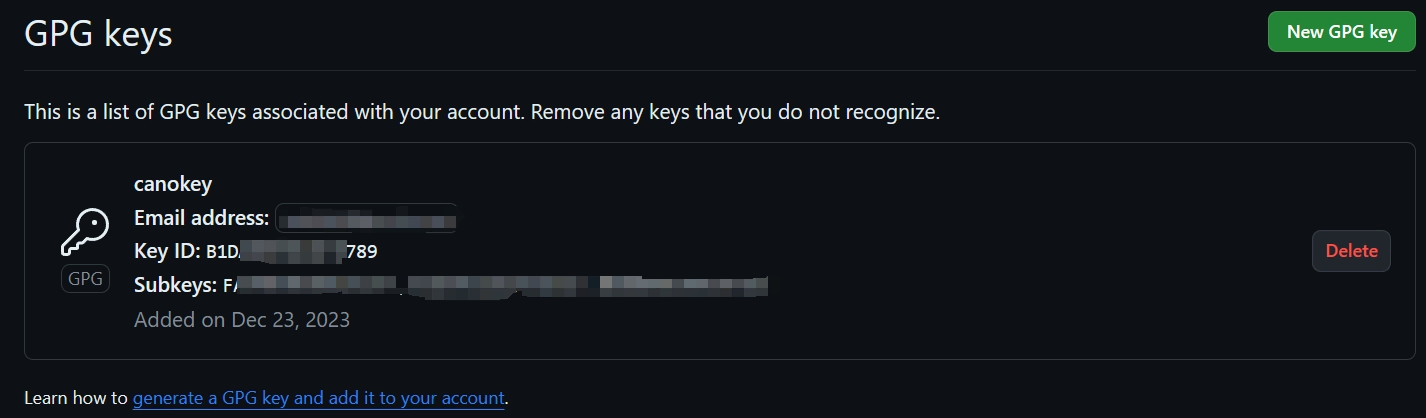
将公钥 gpg-public-key.asc 中的内容分复制到 Github 设置,便可通过 GPG 密钥签名 Commit 了。
隐私第一!!
不要将公钥上传到任何的 Key Server,如果确有上传的必要,也不要使用自己的真实姓名!!
将 GPG 公钥导入电脑
为了让本机识别上述生成的公钥,我们需要执行以下命令将公钥导入电脑:
| |
然后,执行以下命令信任该公钥:
| |
接下来,重新插拔物理秘钥,执行 gpg --card-status 命令,成功显示出物理秘钥的 GPG 信息就表示导入成功了。
备份 GPG 工程
将 /d/data 中的内容加密压缩后保存到安全的地方:
| |
备份完成后,销毁本地的 /d/data。
通过物理密钥签名 Github Commit
首先,将生成的 gpg-public-key.asc 中的内容 配置 到 Github:
再然后,执行以下命令配置 Git:
| |
gpg.program:由于我们使用的是 Git Bash,所以这里指定 Git 下的 gpg.exe。如果要使用 PowerShell,这里可以改成 GunPG 下的工具。user.signingkey为上文生成的签名子密钥 Key ID,注意子密钥末尾的!感叹号不能丢。
最后,移动到待提交的工程目录下,使能当前工程的 commit.gpgsign,便可在 git commit 时触发 GPG 签名校验(可能会弹窗要求输入 GPG PIN,默认为 123456):
| |
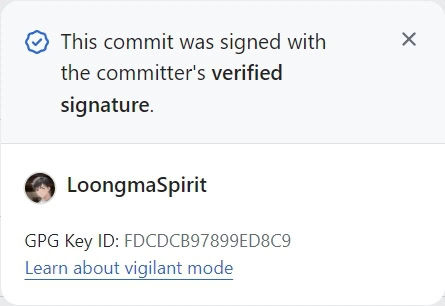
提交代码后,如果 gpg 设置的 email 与 Github 账户的 email 一样,便可显示 Verified 认证:
修改物理秘钥的 GPG PIN
为了安全,我们在完成以上配置后最好修改物理秘钥的默认 PIN 码。首先将秘钥插入 USB,然后打开 Git Bash 窗口,键入以下命令:
| |
显示出秘钥信息后,紧接着输入 admin:
| |
最后输入 passwd 即可按提示修改 PIN:
| |
至此,本文的主要内容就介绍完了!
参考资料: